How to Build a General-Purpose AI Agent in 131 Lines of Python
The following article originally appeared on Hugo Bowne-Anderson’s newsletter, Vanishing Gradients, and is being republished here with the author’s permission. In this post, we’ll build two AI agents from scratch in Python. One will be a coding agent, the other a search agent. Why have I called this post “How to Build a General-Purpose AI […]

The following article originally appeared on Hugo Bowne-Anderson’s newsletter, Vanishing Gradients, and is being republished here with the author’s permission.
In this post, we’ll build two AI agents from scratch in Python. One will be a coding agent, the other a search agent.
Why have I called this post “How to Build a General-Purpose AI Agent in 131 Lines of Python” then? Well, as it turns out now, coding agents are actually general-purpose agents in some quite surprising ways.
What I mean by this is once you have an agent that can write code, it can:
- Do a huge number of things you don’t often think of as involving code, and
- Extend itself to do even more things.
It’s more appropriate to think of coding agents as “computer-using agents” that happen to be great at writing code. That doesn’t mean you should always build a general-purpose agent, but it’s worth understanding what you’re actually building when you give an LLM shell access. That’s also why we’ll build a search agent in this post: to show the pattern works regardless of what you’re building.
For example, the coding agent we’ll build below has four tools: read, write, edit, and bash.
It can do
- File/life organization: Clean your desktop, sort downloads by type, rename vacation photos with dates, find and delete duplicates, organize receipts into folders. . .
- Personal productivity: Search all your notes for something you half-remember, compile a packing list from past trips, find all PDFs containing “tax” from last year. . .
- Media management: Rename a season of TV episodes properly, convert images to different formats, extract audio from videos, resize photos for social media. . .
- Writing and content: Combine multiple docs into one, convert between formats, find-and-replace across many files. . .
- Data wrangling: Turn a messy CSV into a clean address book, extract emails from a pile of files, merge spreadsheets from different sources. . .
This is a small subset of what’s possible. It’s also the reason Claude Cowork seemed promising and why OpenClaw has taken off in the way it did.
So how can you build this? In this post, I’ll show you how to build a minimal version.
Agents are just LLMs with tools in a loop
Agents are just LLMs with tools in a conversation loop and once you know the pattern, you’ll be able to build all types of agents with it:

As Ivan Leo wrote,
The barrier to entry is remarkably low: 30 minutes and you have an AI that can understand your codebase and make edits just by talking to it.
The goal here is to show that the pattern is the same regardless of what you’re building an agent for. Coding agent, search agent, browser agent, email agent, database agent: they all follow the same structure. The only difference is the tools you give them.
Part 1: The coding agent
We’ll start with a coding agent that can read, write, and execute code. As stated, the ability to write and execute code with bash also turns a “coding agent” into a “general-purpose agent.” With shell access, it can do anything you can do from a terminal:
- Sort and organize your local filesystem
- Clean up your desktop
- Batch rename photos
- Convert file formats
- Manage Git repos across multiple projects
- Install and configure software
Check out Ivan Leo’s post for how to do this in JavaScript and Thorsten Ball’s post for how to do it in Go.
Setup
Start by creating our project:

We’ll be using Anthropic here. Feel free to use your LLM of choice. For bonus points, use Pydantic AI (or a similar library) and have a consistent interface for the various different LLM providers. That way you can use the same agentic framework for both Claude and Gemini!
Make sure you’ve got an Anthropic API key set as ANTHROPIC_API_KEY environment variable.
We’ll build our agent in four steps:
- Hook up our LLM
- Add a tool that reads files
- Add more tools:
write,edit, andbash
- Add more tools:
- Build the agentic loop
- Build the conversational loop
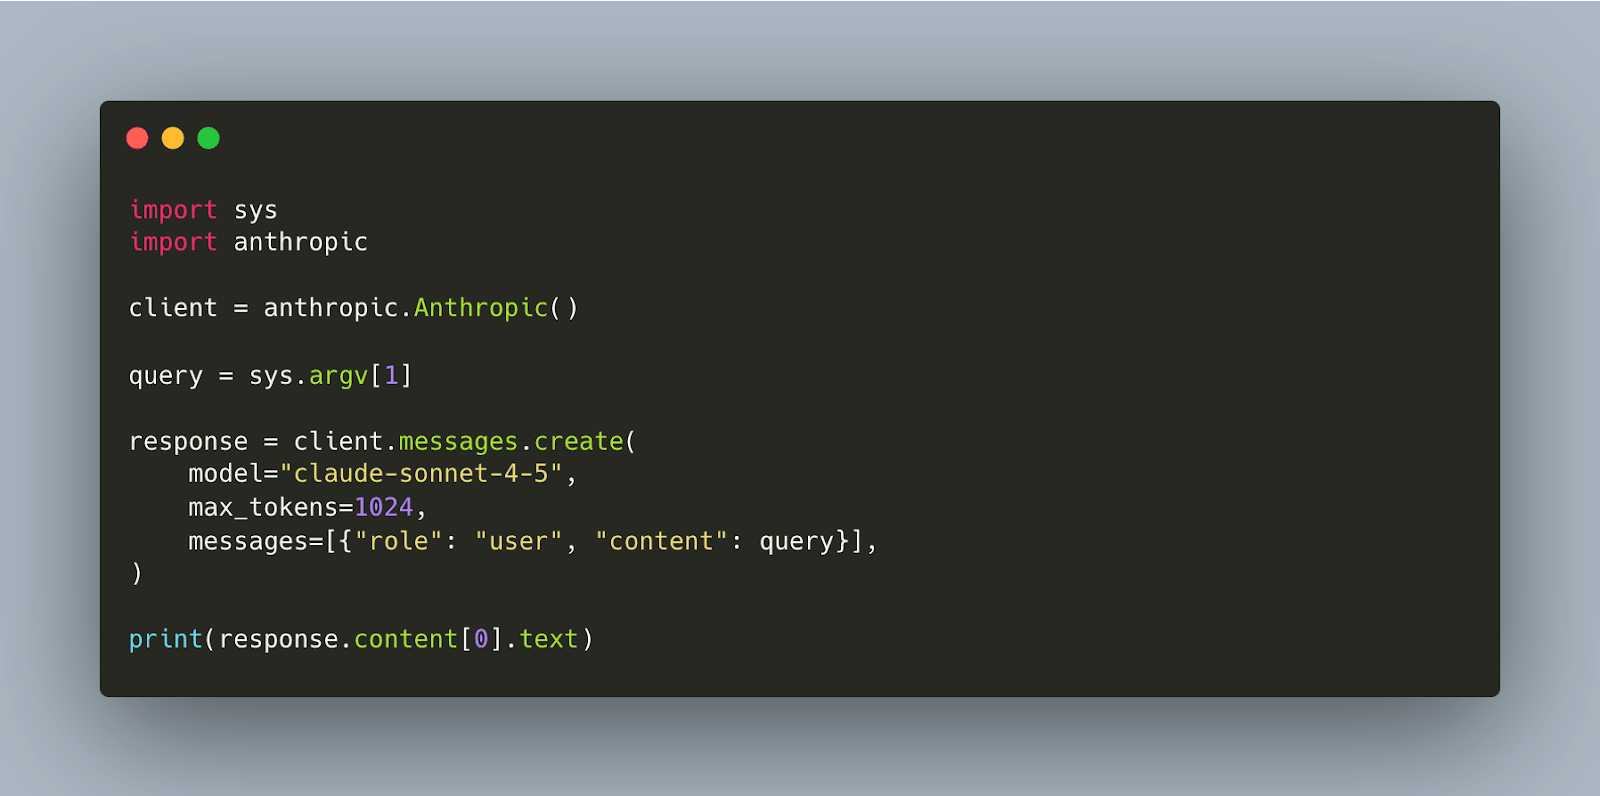
1. Hook up our LLM


Text in, text out. Good! Now let’s give it a tool.
2. Add a tool (read)
We’ll start by implementing a tool called read which will allow the agent to read files from the filesystem. In Python, we can use Pydantic for schema validation, which also generates JSON schemas we can provide to the API:

The Pydantic model gives us two things: validation and a JSON schema. We can see what the schema looks like:


We wrap this into a tool definition that Claude understands:

Then we add tools to the API call, handle the tool request, execute it, and send the result back:

Let’s see what happens when we run it:

This script calls the Claude API with a user query passed via command line. It sends the query, gets a response, and prints it.
Note that the LLM matched on the tool description: Accurate, specific descriptions are key! It’s also worth mentioning that we’ve made two LLM calls here:
- One in which the tool is called
- A second in which we send the result of the tool call back to the LLM to get the final result
This often trips up people building agents for the first time, and Google has made a nice visualization of what we’re actually doing:

2a. Add more tools (write, edit, bash)
We have a read tool, but a coding agent needs to do more than read. It needs to:
- Write new files
- Edit existing ones
- Execute code to test it
That’s three more tools: write, edit, and bash.
Same pattern as read. First the schemas:

Then the executors:

And the tool definitions, along with the code that runs whichever one Claude picks:

The bash tool is what makes this actually useful: Claude can now write code, run it, see errors, and fix them. But it’s also dangerous. This tool could delete your entire filesystem! Proceed with caution: Run it in a sandbox, a container, or a VM.
Interestingly, bash is what turns a “coding agent” into a “general-purpose agent.” With shell access, it can do anything you can do from a terminal:
- Sort and organize your local filesystem
- Clean up your desktop
- Batch rename photos
- Convert file formats
- Manage Git repos across multiple projects
- Install and configure software
It was actually “Pi: The Minimal Agent Within OpenClaw” that inspired this example.
Try asking Claude to edit a file: It often wants to read it first to see what’s there. But our current code only handles one tool call. That’s where the agentic loop comes in.
3. Build the agentic loop
Right now Claude can only call one tool per request. But real tasks need multiple steps: read a file, edit it, run it, see the error, fix it. We need a loop that lets Claude keep calling tools until it’s done.
We wrap the tool handling in a while True loop:

Note that here we have sent the entire past history of accumulated messages as we progress through loop iterations. When building this out more, you’ll want to engineer and manage your context more effectively. (See below for more on this.)
Let’s try a multistep task:

4. Build the conversational loop
Right now the agent handles one query and exits. But we want a back-and-forth conversation: Ask a question, get an answer, ask a follow-up. We need an outer loop that keeps asking for input.
We wrap everything in a while True:

The messages list persists across turns, so Claude remembers context. That’s the complete coding agent.
Once again we’re merely appending all previous messages, which means the context will grow quite quickly!
A note on agent harnesses
An agent harness is the scaffolding and infrastructure that wraps around an LLM to turn it into an agent. It handles:
- The loop: prompting the model, parsing its output, executing tools, feeding results back
- Tool execution: actually running the code/commands the model asks for
- Context management: what goes in the prompt, token limits, history
- Safety/guardrails: confirmation prompts, sandboxing, disallowed actions
- State: keeping track of the conversation, files touched, etc.
And more.
Think of it like this: The LLM is the brain; the harness is everything else that lets it actually do things.
What we’ve built above is the hello world of agent harnesses. It covers the loop, tool execution, and basic context management. What it doesn’t have: safety guardrails, token limits, persistence, or even a system prompt!
When building out from this basis, I encourage you to follow the paths of:
- The Pi coding agent, which adds context loading
AGENTS.mdfrom multiple directories, persistent sessions you can resume and branch, and an extensibility system (skills, extensions, prompts) - OpenClaw, which goes further: a persistent daemon (always-on, not invoked), chat as the interface (Telegram, WhatsApp, etc.), file-based continuity (
SOUL.md,MEMORY.md, daily logs), proactive behavior (heartbeats, cron), preintegrated tools (browser, subagents, device control), and the ability to message you without being prompted
Part 2: The search agent
In order to really show you that the agentic loop is what powers any agent, we’ll now build a search agent (inspired by a podcast I did with search legends John Berryman and Doug Turnbull). We’ll use Gemini for the LLM and Exa for web search. You can find the code here.
But first, the astute reader may have an interesting question: If a coding agent really is a general-purpose agent, why would anyone want to build a search agent when we could just get a coding agent to extend itself and turn itself into a search agent? Well, because if you want to build a search agent for a business, you’re not going to do it by building a coding agent first… So let’s build it!
Setup
As before, we’ll build this step-by-step. Start by creating our project:

Set GEMINI_API_KEY (from Google AI Studio) and EXA_API_KEY (from exa.ai) as environment variables.
We’ll build our agent in four steps (the same four steps as always):
- Hook up our LLM
- Add a tool (web_search)
- Build the agentic loop
- Build the conversational loop
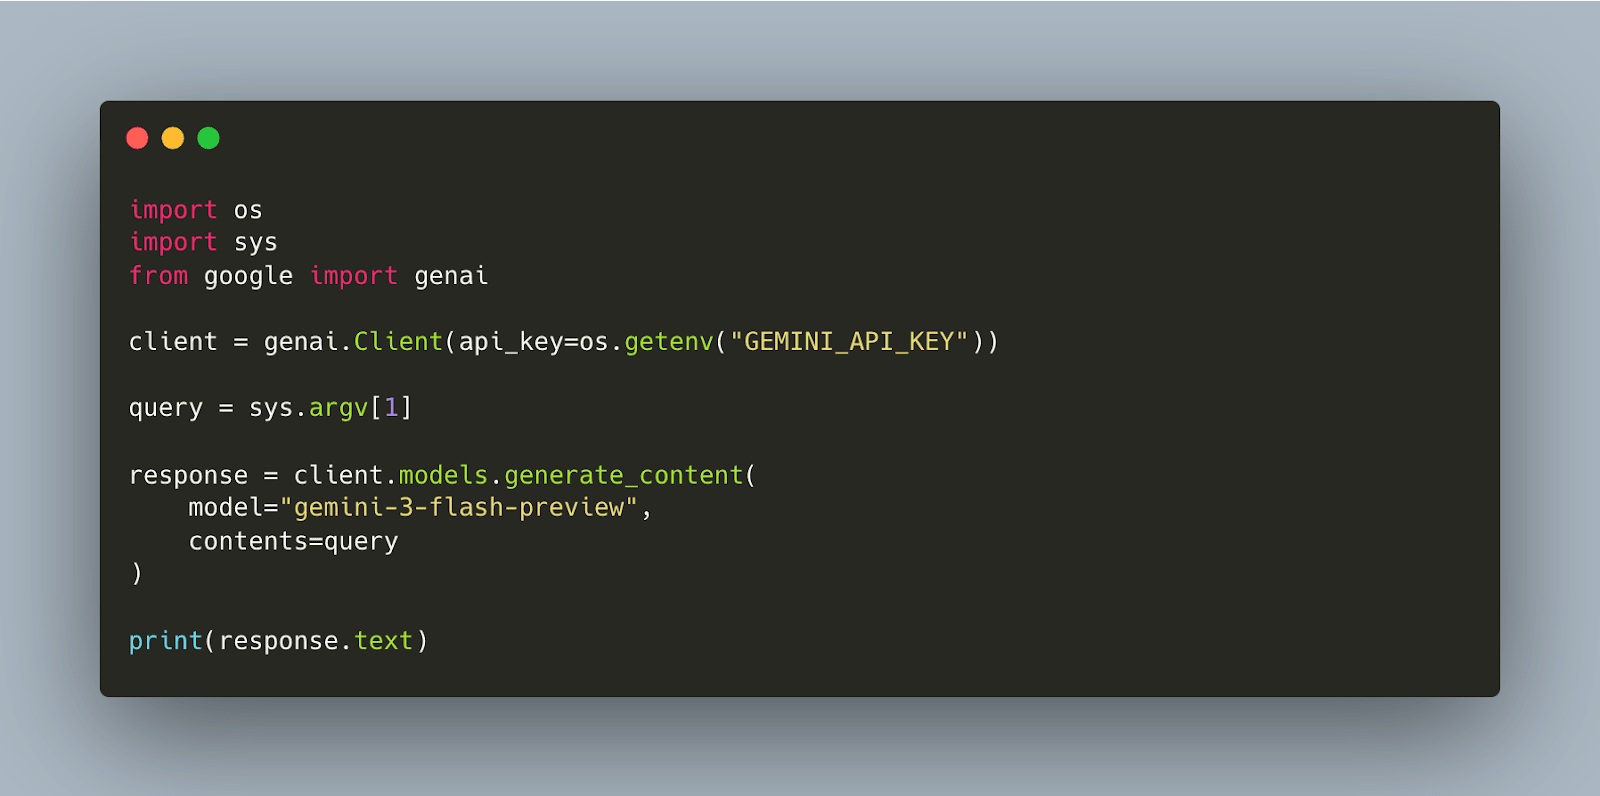
1. Hook up our LLM


2. Add a tool (web_search)
Gemini can answer from its training data, but we don’t want that, man! For current information, it needs to search the web. We’ll give it a web_search tool that calls Exa.

The system instruction grounds the model, (ideally) forcing it to search instead of guessing. Note that you can configure Gemini to always use web_search, which is 100% dependable, but I wanted to show the pattern that you can use with any LLM API.
We then send the tool call result back to Gemini:

3. Build the agentic loop
Some questions need multiple searches. “Compare X and Y” requires searching for X, then searching for Y. We need a loop that lets Gemini keep searching until it has enough information.


4. Build the conversational loop
Same as before: We want back-and-forth conversation, not one query and exit. Wrap everything in an outer loop:

Messages persist across turns, so follow-up questions have context.
Extend it
The pattern is the same for both agents. Add any tool:
web_searchto the coding agent: Look things up while codingbashto the search agent: Act on what it findsbrowser: Navigate websitessend_email: Communicatedatabase_query: Run SQL
One thing we’ll be doing is showing how general purpose a coding agent really can be. As Armin Ronacher wrote in “Pi: The Minimal Agent Within OpenClaw”:
Pi’s entire idea is that if you want the agent to do something that it doesn’t do yet, you don’t go and download an extension or a skill or something like this. You ask the agent to extend itself. It celebrates the idea of code writing and running code.
Conclusion
Building agents is straightforward. The magic isn’t complex algorithms; it’s the conversation loop and well-designed tools.
Both agents follow the same pattern:
- Hook up the LLM
- Add a tool (or multiple tools)
- Build the agentic loop
- Build the conversational loop
The only difference is the tools.
Thank you to Ivan Leo, Eleanor Berger, Mike Powers, Thomas Wiecki, and Mike Loukides for providing feedback on drafts of this post.
Share
What's Your Reaction?
 Like
0
Like
0
 Dislike
0
Dislike
0
 Love
0
Love
0
 Funny
0
Funny
0
 Angry
0
Angry
0
 Sad
0
Sad
0
 Wow
0
Wow
0


